Two ways to build Gutenberg Blocks
Last night I had the pleasure of presenting at the Denver WordPress Developer meetup about building Gutenberg Blocks. In this post, I want to present two (of many) approaches to building Gutenberg blocks.
First, some context
Gutenberg is the new block-based editor coming to WordPress 5.0, currently scheduled for release on November 27, 2018.
This new editor allows users to compose content using “Blocks”. Blocks can be anything, from paragraphs of text, to images or galleries, to embedded videos, contact forms, dynamic content from post types or external sources. . .the possibilities are endless.
Blocks have some conceptual similarities to shortcodes, in that blocks allow
Two approaches to building blocks
Getting started building blocks with Gutenberg can be a struggle. At the moment, official documentation for Gutenberg is still very incomplete and even much of the existing documentation is outdated and incorrect. So it can be tough to figure out how to build blocks and what options there are to make the process of building blocks easier.
Two (of many out there) projects that make it easier to get up and running with custom Gutenberg Blocks are Create Guten Block by Ahmad
In order to compare experiences, we’ll look at what it takes to make the same block using both Advanced Custom Fields and Create Guten Block.
Build a testimonial block
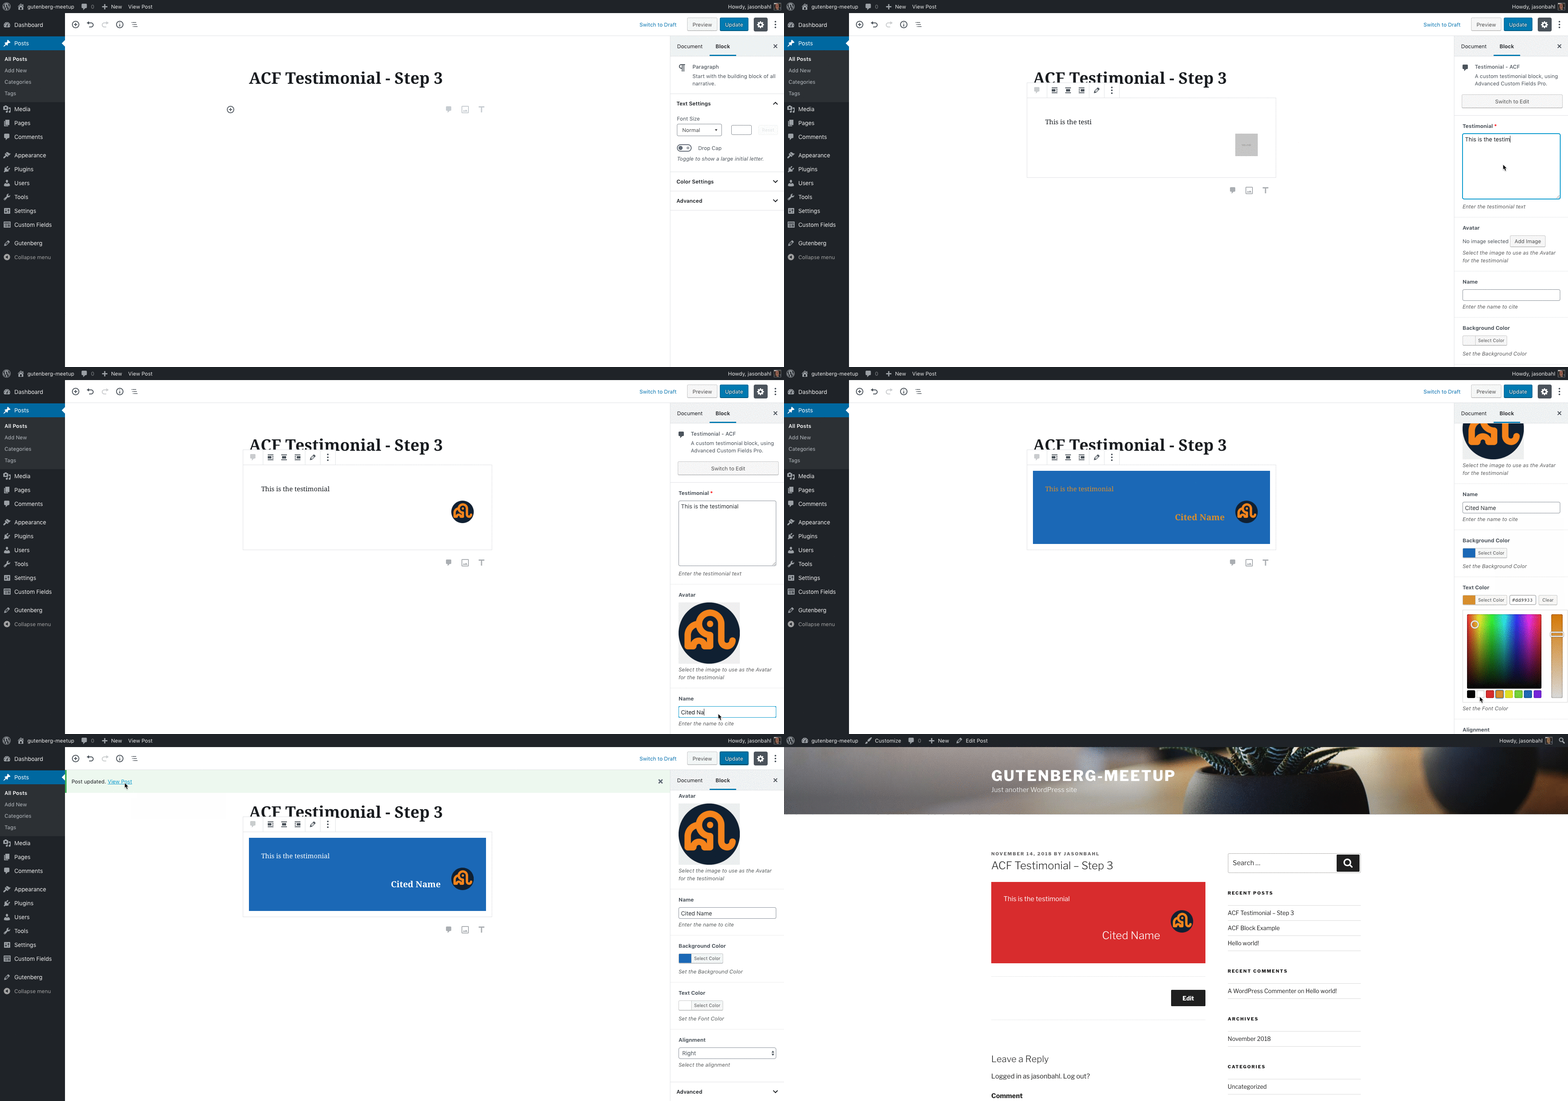
The block we’re going to create is a simple “Testimonial” block, that allows for a testimonial text to be added, an avatar image, a citation name, some color options for setting the background color and text color, and some alignment options.
Below is an GIF showing the final block in action. While the preview is of the block built using ACF, the goal is to build a comparable block using Create Guten Block.
Building the block with Advanced Custom Fields
The first approach I want to look at is using Advanced Custom Fields. In my opinion, this is the quickest way to get up and running with building custom blocks for Gutenberg. It requires the least amount of code, in this case only PHP code and no custom JavaScript and provides some very nice features with minimal effort.
Install Advanced Custom Fields
In order to build custom Gutenberg Blocks with Advanced Custom Fields, you will need version 5.8 or newer. At the time of writing this, v5.8 has not been released to the public, but is available to ACF Pro customers and can be downloaded from the ACF dashboard. The Gutenberg features are planned to be released to both the FREE and PRO versions of the ACF plugin.
Once the plugin is installed, we can start building our custom block.
Step 1: Register the Block
The first thing you’ll want to do is create a new plugin. To do that, create a new directory in your /wp-content/plugins/wp-contentgutenberg-testimonial-acf-example
In that directory, create a file named gutenberg-testimonial-acf-example.php and add the following code:
<?php
/**
 * Plugin Name: Gutenberg Testimonial ACF Example
 */
Now we have a plugin that we can activate in our WordPress dashboard.
Next, add the following code to register your block with Advanced Custom Fields.
/**
 * Register the block once ACF has initialized
 */
add_action( 'acf/init', 'my_acf_init' );
function my_acf_init() {
 	// check function exists
	if ( function_exists( 'acf_register_block' ) ) {
 		acf_register_block( [
			'name'            => 'acf-testimonial',
			'title'           => __( 'Testimonial - ACF', 'gutenberg-testimonial-acf-example' ),
			'description'     => __( 'A custom testimonial block, using Advanced Custom Fields Pro.', 'gutenberg-testimonial-acf-example' ),
			'render_callback' => 'acf_testimonial_callback',
			'category'        => 'formatting',
			'icon'            => 'admin-comments',
			'keywords'        => [ 'testimonial', 'quote', 'acf' ],
		] );
	}
 }
 /**
 * Render Callback for the block. This is what is output in the Theme AND
 * in the preview within Gutenberg
 *
 * @param $block
 */
function acf_testimonial_callback( $block ) {
	?>
	<h2><?php echo $block['name']; ?></h2>
	<?php
}
This code is registering a Gutenberg block using acf_register_block()
You’ll notice that along with registering our block, we’ve also created a callback function that is called by our blocks render_callback.
This callback works much like a shortcode callback, in that the Block attributes will be passed to this callback, and the callback will return the output for the block. In this case, we’re outputting an <h2> tag with the name of the Block.
Gutenberg core uses the render_callback to render blocks in the theme, but you’re still responsible for creating a JavaScript implementation of your block to preview in the Editor. ACF makes use of the render_callback to preview your block in the Editor as well, allowing you to build custom blocks without writing any custom JavaScript.
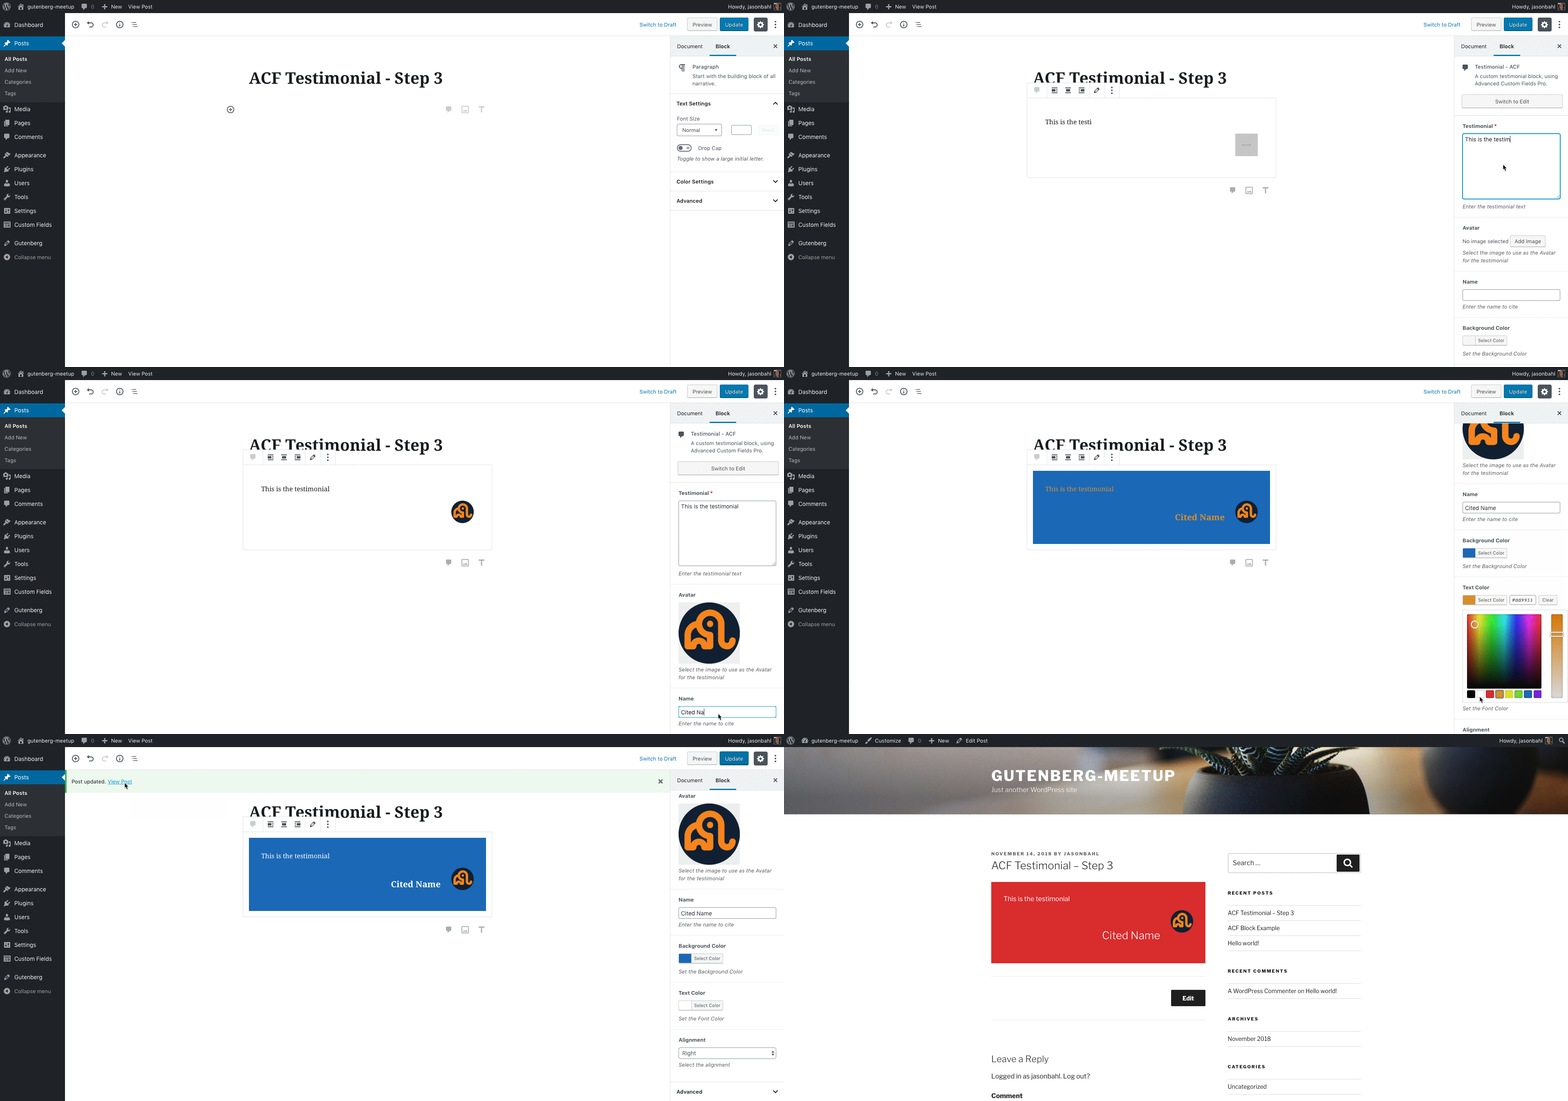
Here’s a preview of the block at this stage:
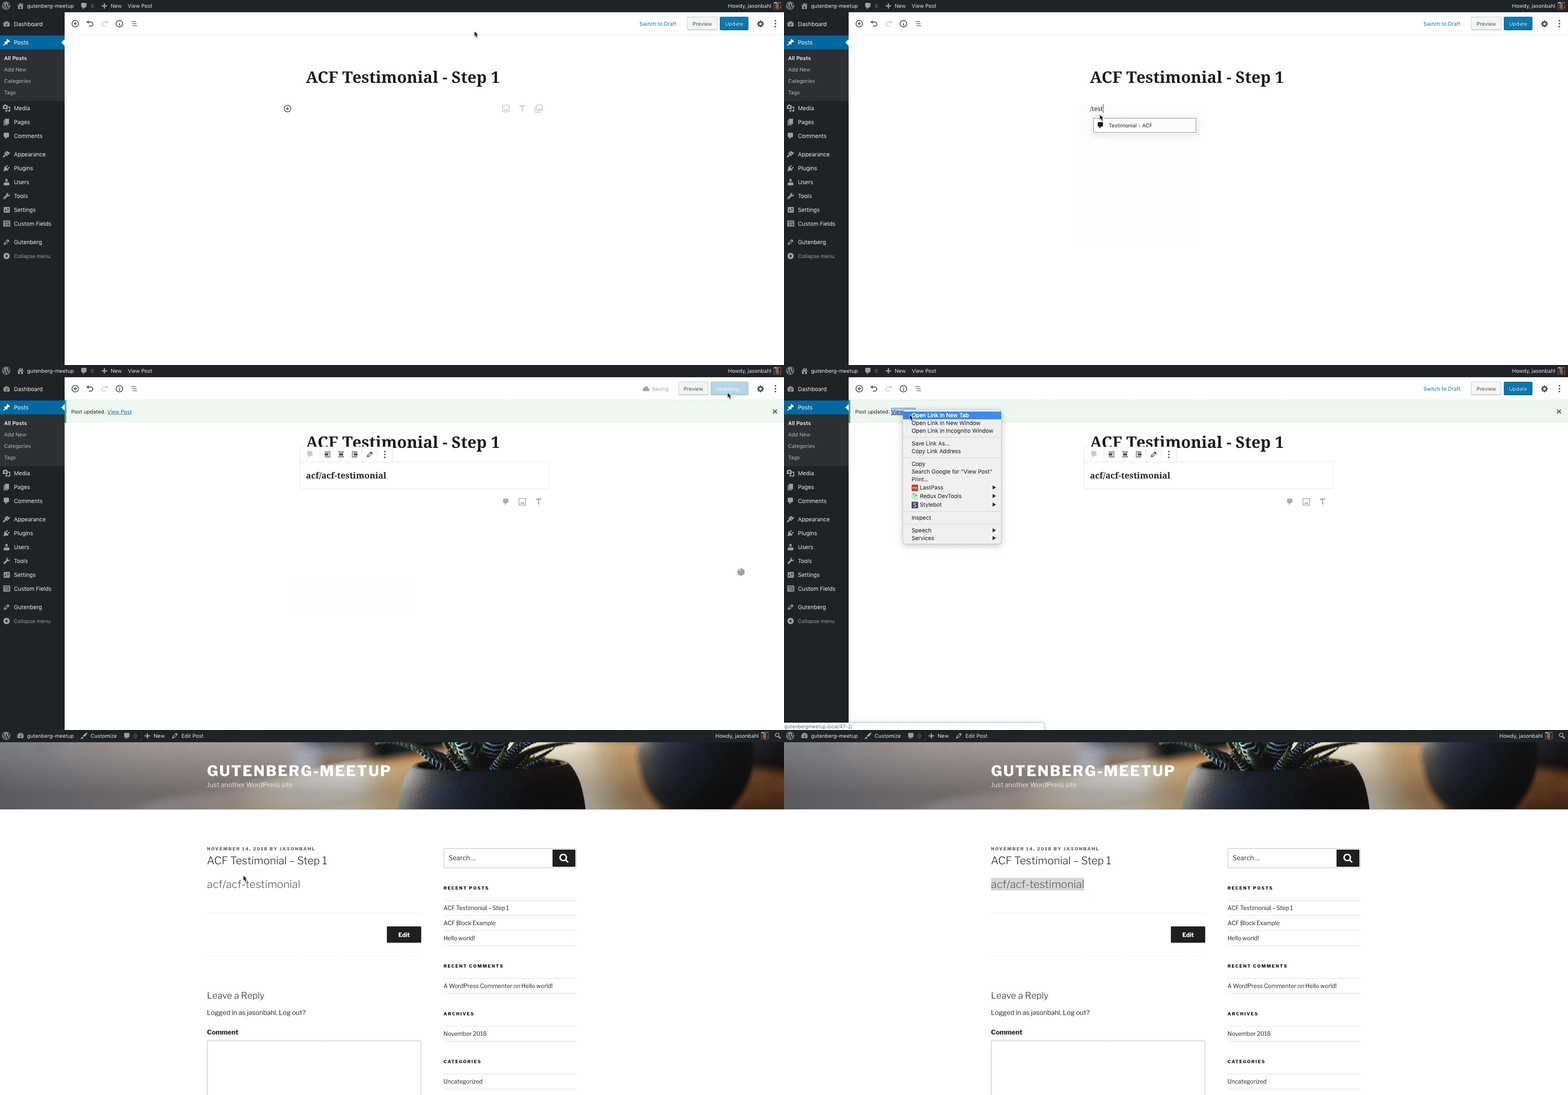
We can see the block can be added to the content of our post, and we see the title of the block in an <h2> tag both in our Editor and in our theme. . .but we can’t really do much with the block yet.
Step 2: Write our markup and styles
In this next step, we’ll write the markup that we’ll use to output our
Replace the render_callback() with the following:
function acf_testimonial_callback( $block ) {
	$block_id = $block['id'];
	$testimonial = 'This is the testimonial';
	$alignment = 'right';
	$avatar_url = 'https://placehold.it/100x100';
	$name = 'Cited Person';
	$text_color = 'white';
	$background_color = 'blue';
	?>
	<div id="<?php echo 'acf-testimonial-' . esc_attr( $block_id ); ?>" class="acf-testimonial">
		<div class="acf-testimonial-text">
			<?php echo esc_html( $testimonial ); ?>
		</div>
		<div class="acf-testimonial-info <?php echo esc_attr( $alignment ); ?>">
			<div class="acf-testimonial-avatar-wrap">
				<img src="<?php echo esc_url( $avatar_url ); ?>"/>
			</div>
			<h2 class="acf-testimonial-avatar-name">
				<?php echo esc_html( $name ); ?>
			</h2>
		</div>
	</div>
	<style>
		#<?php echo 'acf-testimonial-' . $block_id; ?>{
			background-color: <?php echo $background_color; ?>;
			color: <?php echo $text_color; ?>;
			padding: 30px;
		}
		#<?php echo 'acf-testimonial-' . $block_id; ?> h2{
			color: <?php echo $text_color; ?>;
		}
		.acf-testimonial-info{
			position: relative;
			display: inline-block;
			width: 100%;
			margin-top: 15px;
			min-height: 55px;
			padding-top: 5px;
			line-height: 1.4;
			text-align: left;
		}
		.acf-testimonial-info.right {
			text-align: right;
		}
		.acf-testimonial-avatar-wrap {
			position: absolute;
			left: 0;
			top: 0;
		}
		.acf-testimonial-info.right .acf-testimonial-avatar-wrap {
			right: 0;
		}
		.acf-testimonial-avatar-wrap img {
			max-width: 55px;
		}
		.acf-testimonial-avatar-name {
			color: #ffffff;
			margin-right: 81px;
			margin-left: 0;
			padding-left: 0;
			left: 0;
		}
	</style>
	<?php
}
Here the first thing we do is define some variables that will eventually be dynamic values from our ACF Fields. Then we write some markup and a <style> tag to go with the markup, and we use our variables in the appropriate places to make our block dynamic.
Note: you could/should move the static styles to an external stylesheet and enqueue, then use the <style> tag only for the dynamic styles. For brevity, I’ve included all styles, static and dynamic in the style tag.
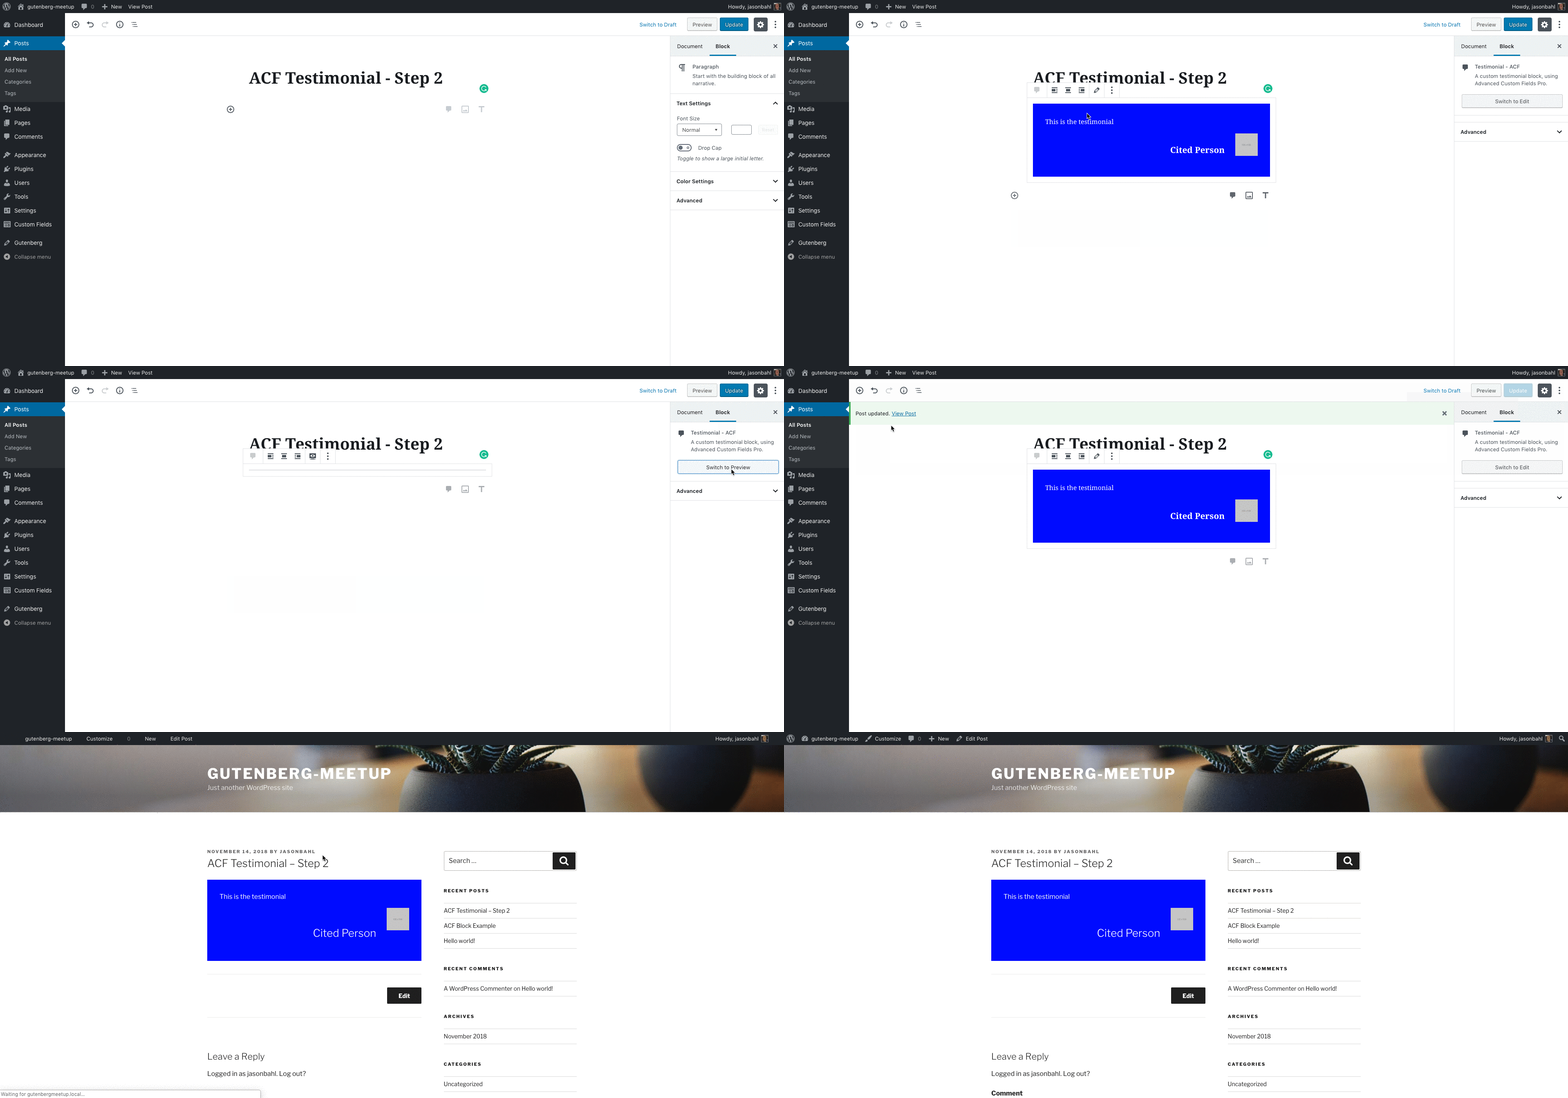
At this point, our block is starting to take shape. We can add the block to our editor, and you can see that it has some structure and style to it and is consistent in the editor and our theme
Step 3: Register fields and make the block editable
Now that we have a block registered using acf_register_block() our block is now considered a valid location for adding Field groups to using ACF.
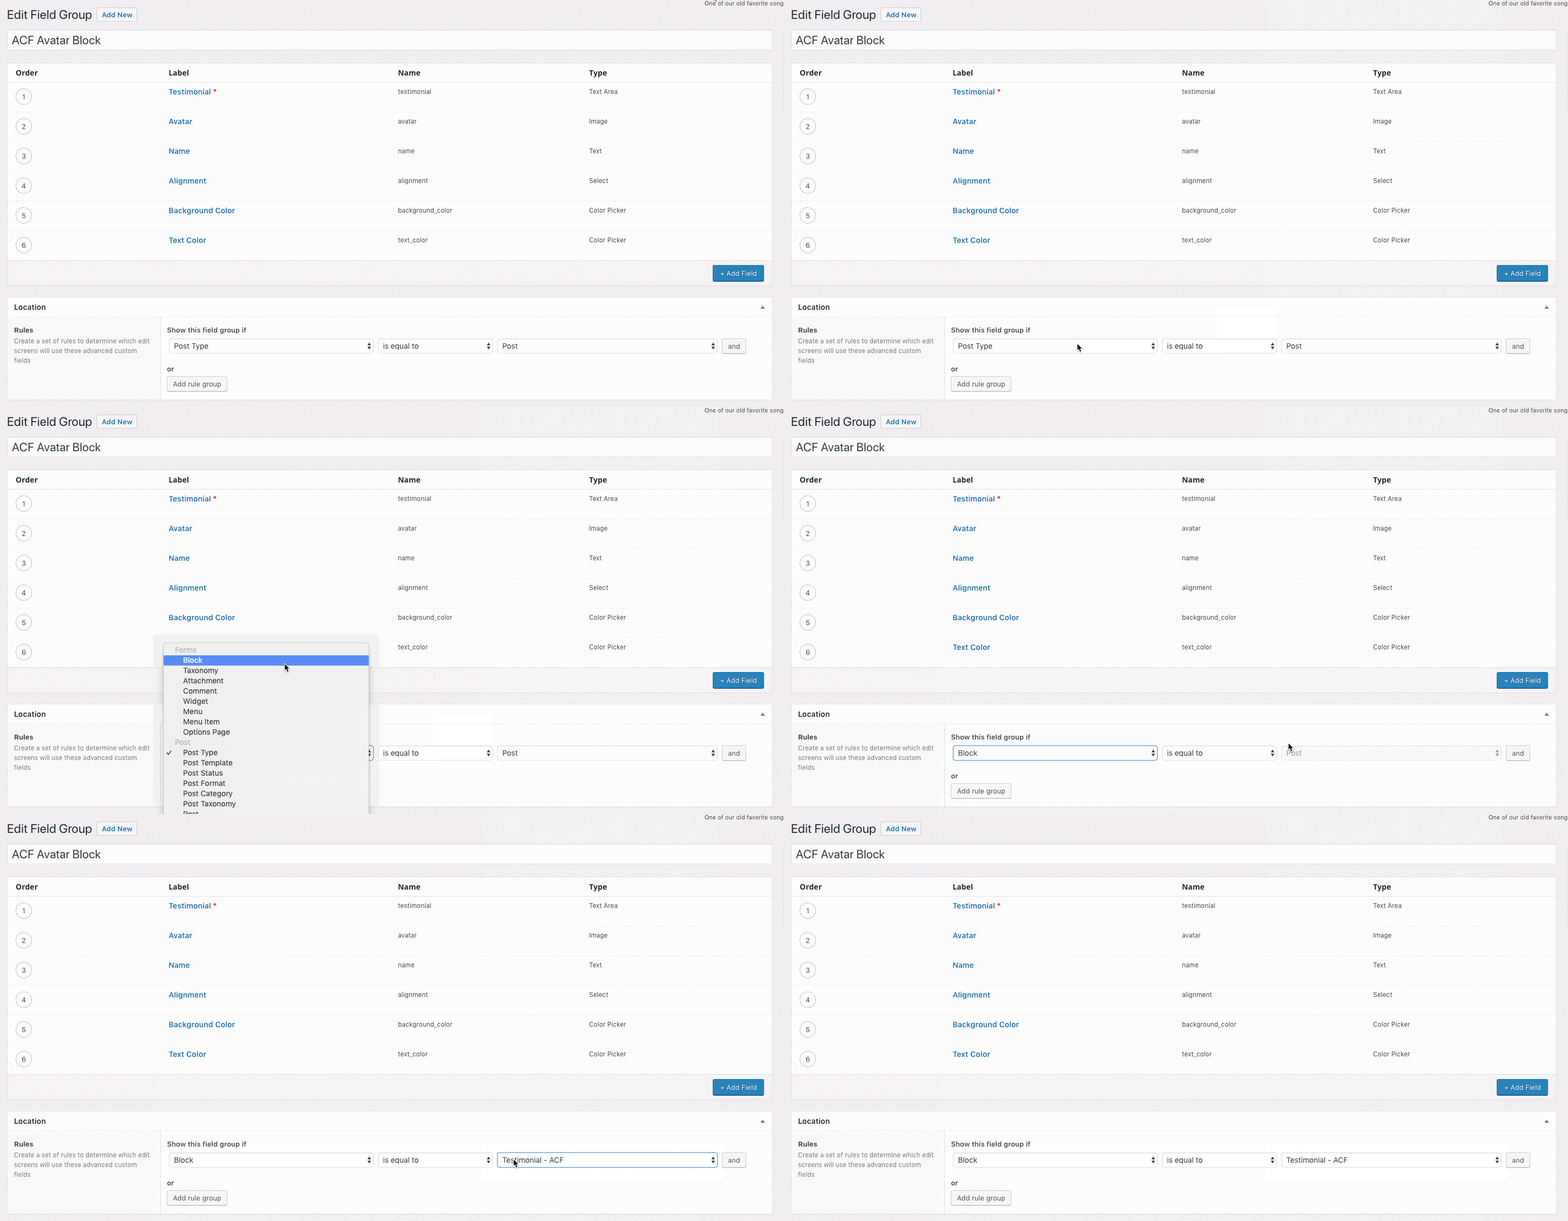
Using the ACF UI, we can create a new field group and add the fields we’ll need and apply the field group to our block.
For this block, we know the dynamic values we want to edit, so we can create the following fields:
- Testimonial: Textarea field for editing the testimonial text
- Name:
Text field for who citation of who said the testimonial - Avatar: Image field for uploading an image to the Testimonial
- Alignment: Select field for choosing Right or Left alignment
- Background Color: Color Picker field for selecting the background color
- Text Color: Color Picker field for selecting the text color
Then, we can add our Field Group to our block, as it’s a valid Field Group Location because of acf_register_block(). See below:
You can also register your ACF Fields using PHP or JSON and keep your Fields versioned. In our case, we’ll use PHP.
Add the following code to your plugin, right below where we registered our block.
if ( function_exists( 'acf_add_local_field_group' ) ) {
	acf_add_local_field_group( [
		'key'      => 'group_5bec5e04859ef',
		'title'    => 'ACF Avatar Block',
		'fields'   => [
			[
				'key'          => 'field_5bec5e12675e1',
				'label'        => 'Testimonial',
				'name'         => 'testimonial',
				'type'         => 'textarea',
				'instructions' => 'Enter the testimonial text',
				'required'     => 1,
			],
			[
				'key'          => 'field_5bec5f940015c',
				'label'        => 'Avatar',
				'name'         => 'avatar',
				'type'         => 'image',
				'instructions' => 'Select the image to use as the Avatar for the testimonial',
			],
			[
				'key'          => 'field_5bec5fb10015d',
				'label'        => 'Name',
				'name'         => 'name',
				'type'         => 'text',
				'instructions' => 'Enter the name to cite',
			],
			[
				'key'          => 'field_5bec5fb100166',
				'label'        => 'Background Color',
				'name'         => 'background_color',
				'type'         => 'color_picker',
				'instructions' => 'Set the Background Color',
			],
			[
				'key'          => 'field_5bec5fb100199',
				'label'        => 'Text Color',
				'name'         => 'text_color',
				'type'         => 'color_picker',
				'instructions' => 'Set the Font Color',
			],
			[
				'key'          => 'field_5bec5fcf0015e',
				'label'        => 'Alignment',
				'name'         => 'alignment',
				'type'         => 'select',
				'instructions' => 'Select the alignment',
				'choices'      => [
					'right' => 'Right',
					'left'  => 'Left',
				],
			],
		],
		'location' => [
			[
				[
					'param'    => 'block',
					'operator' => '==',
					'value'    => 'acf/acf-testimonial',
				],
			],
		],
		'active'   => 1,
	] );
}
This is registers the fields we need so we don’t need to use the ACF UI, and the location is set to our block.
At this point, ACF has done the heavy lifting for us by wiring up our fields to our block. So now we can interact with our block and edit the fields we’ve defined. But we need to wire up the values of the fields to update our block in the render callback.
We’ve already defined the variables, so now we just need to swap them with the field values.
In your render callback, replace the variable definitions with the following:
$block_id         = $block['id'];
$testimonial      = get_field( 'testimonial' );
$alignment        = get_field( 'alignment' );
$avatar           = get_field( 'avatar' );
$avatar_url       = ! empty( $avatar['url'] ) ? $avatar['url'] : 'https://placehold.it/100x100';
$name             = get_field( 'name' );
$text_color       = get_field( 'text_color' );
$background_color = get_field( 'background_color' );
Here, instead of hard-coding our values, we use ACF to get the field values, using the ACF function get_field(). ACF does some magic to know the context of the block, so all we have to specify is the name of the field we want to get, and we’re good to go. The get_field() function is unique to the specific block, so you can have many blocks on one page each with their own dynamic values and get_field() will get the values for that specific block.
Now, with our fields registered and wired up, we have a fully interactive custom block, and haven’t written a single line of JavaScript.
Building the same block with “Create Guten Block”
Create Guten Block is a fantastic project from an incredibly influential member of the WordPress – and greater Open Source – community Ahmad Awais.
In the same vein as Create React App, Create Guten Block is a tool that scaffolds out a project with pre-configured
Step 1: Scaffold the block
Note: You’ll need the latest version of node/
The first thing you’ll want to do is create a new plugin. To do that, create a new directory in your /wp-content/plugins/wp-contentgutenberg-testimonial-cgb-example
In that directory, create a file named gutenberg-testimonial-cgb-example.php and add the following code:
<?php
/**
 * Plugin Name: Gutenberg Testimonial Create Guten Block Example
 */
Now we have a plugin that we can activate in our WordPress dashboard.
From the plugin directory, in the command line, run the following command: npx create-guten-block testimonial-cgb
This will run the Create Guten Block script and will scaffold out a new plugin in the /testimonial-cgb directory.
Step 2: Move scaffolded files to project root
We want the scaffolded files at the project root, so let’s move the files from the testimonial-cgb directory to the project root.
Then add the following code to the gutenberg-testimonial-cgb-example.phpplugin.php
// Exit if accessed directly.
if ( ! defined( 'ABSPATH' ) ) {
	exit;
}

/**
 * Block Initializer.
 */
require_once plugin_dir_path( __FILE__ ) . 'src/init.php';
Now, our plugin with a sample block is wired up and ready for us to start hacking on. From the command line, at the plugin root, run the following command to have Webpack start watching for changes: npm run start
Step 2.1: Understand what was scaffolded
At this point, we’ve got a plugin ready to go with an actual functional block. You can add it to a Gutenberg post right now. So, how does this work?
/src/init.php
At the root we are requiring the /src/init.php file, so let’s take a look at that.
In this file, we’ve got 2 hooks executing 2 callback functions.
The first hook is enqueue_block_assets and that executes the callback testimonial_cgb_cgb_block_assets().
This new hook enqueue_block_assets() is run anywhere Gutenberg is enabled, whether that’s the admin or the front-end of a Gutenberg-enabled post/page.
In this case, we’re enqueueing just one stylesheet to be loaded in both the theme and the editor. This will allow us to share styles across the front and back end.
You’ll note that we’re enqueuing a file /dist/blocks.style.build.css. This file is generated by the Create Guten Block webpack build whenever we run npm run build. It takes our .scss files and minifies them to a single CSS file that we can enqueue to WordPress.
The next hook is enqueue_block_editor_assets. This executes the callback testimonial_cgb_cgb_editor_assets(), and that callback enqueues a JavaScript file and another CSS file.
The enqueue_block_editor_assets hook is only executed in the context of the Gutenberg editor, so these are assets we need for the editing experience of Gutenberg, in our case any custom CSS we’ll need to style the editor and the JavaScript needed to interact with our block in the editor.
Both files we’re enqueueing are “built” files generated by running npm run build. These are not the files we will use to edit directly.
/src/blocks.js
This is the entry point for the WebPack script to build our final distributable JavaScript from. So any JavaScript file we import here will be included in the final build. In our case, we’re importing just a single js file from /src/block/block.js. That is the block file we’ll be working with. You can build multiple blocks and import them to this entry point just like we’re importing this one block.
/src/block/block.js
This is the main file we’ll be interacting with. Let’s move to the next step and you’ll get more familiar with this file as we go.
Step 3: Clean up scaffolded code
Create Guten Block scaffolds out the code with a lot of inline comments, which are great for context, but I want us to start in a clean spot with just the code, so let’s replace the /src/blocks/block.js file with the following:
import './style.scss';
import './editor.scss';

const { __ } = wp.i18n;
const { registerBlockType } = wp.blocks;

registerBlockType( 'cgb/testimonial', {
	title: __( 'Testimonial - CGB' ),
	icon: 'shield',
	category: 'common',
	keywords: [
		__( 'testimonial' ),
		__( 'create guten block Example' ),
		__( 'cgb' ),
	],
	edit: function( props ) {
		return (
			<h2>Testimonial CGB - Step 1</h2>
		);
	},
	save: function( props ) {
		return (
            <h2>Testimonial CGB - Step 1</h2>
		);
	},
} );
This will give us a very basic block we can start working with.
What’s going on here?
At the top of the file, we’re importing the .scss files. This allows us to write our styles in SASS, but have WebPack compile them to CSS for us.
Declare dependencies
Next, we declare what functions we’ll be using, and from where.
const { __ } = wp.i18n;
const { registerBlockType } = wp.blocks;
Here, we’re saying we want to make use of the __ function and the registerBlockType function from wp.i18n and wp.blocks libraries respectively.
If you look back in our init.php file, you will note that when we enqueued our Block editor JavaScript file, we declared some dependencies: 'wp-blocks', 'wp-i18n', 'wp-element'.
These are libraries provided by Gutenberg (soon to be WordPress core) that expose functions for us to make use of in our custom Gutenberg code. We need to declare that we want to use these functions and where they’re coming from before we make use of
Register the block
Next we use registerBlockType to register the block. This function tells the Gutenberg application that a new block is available for use in the Gutenberg editor.
The key things to note here are editsave
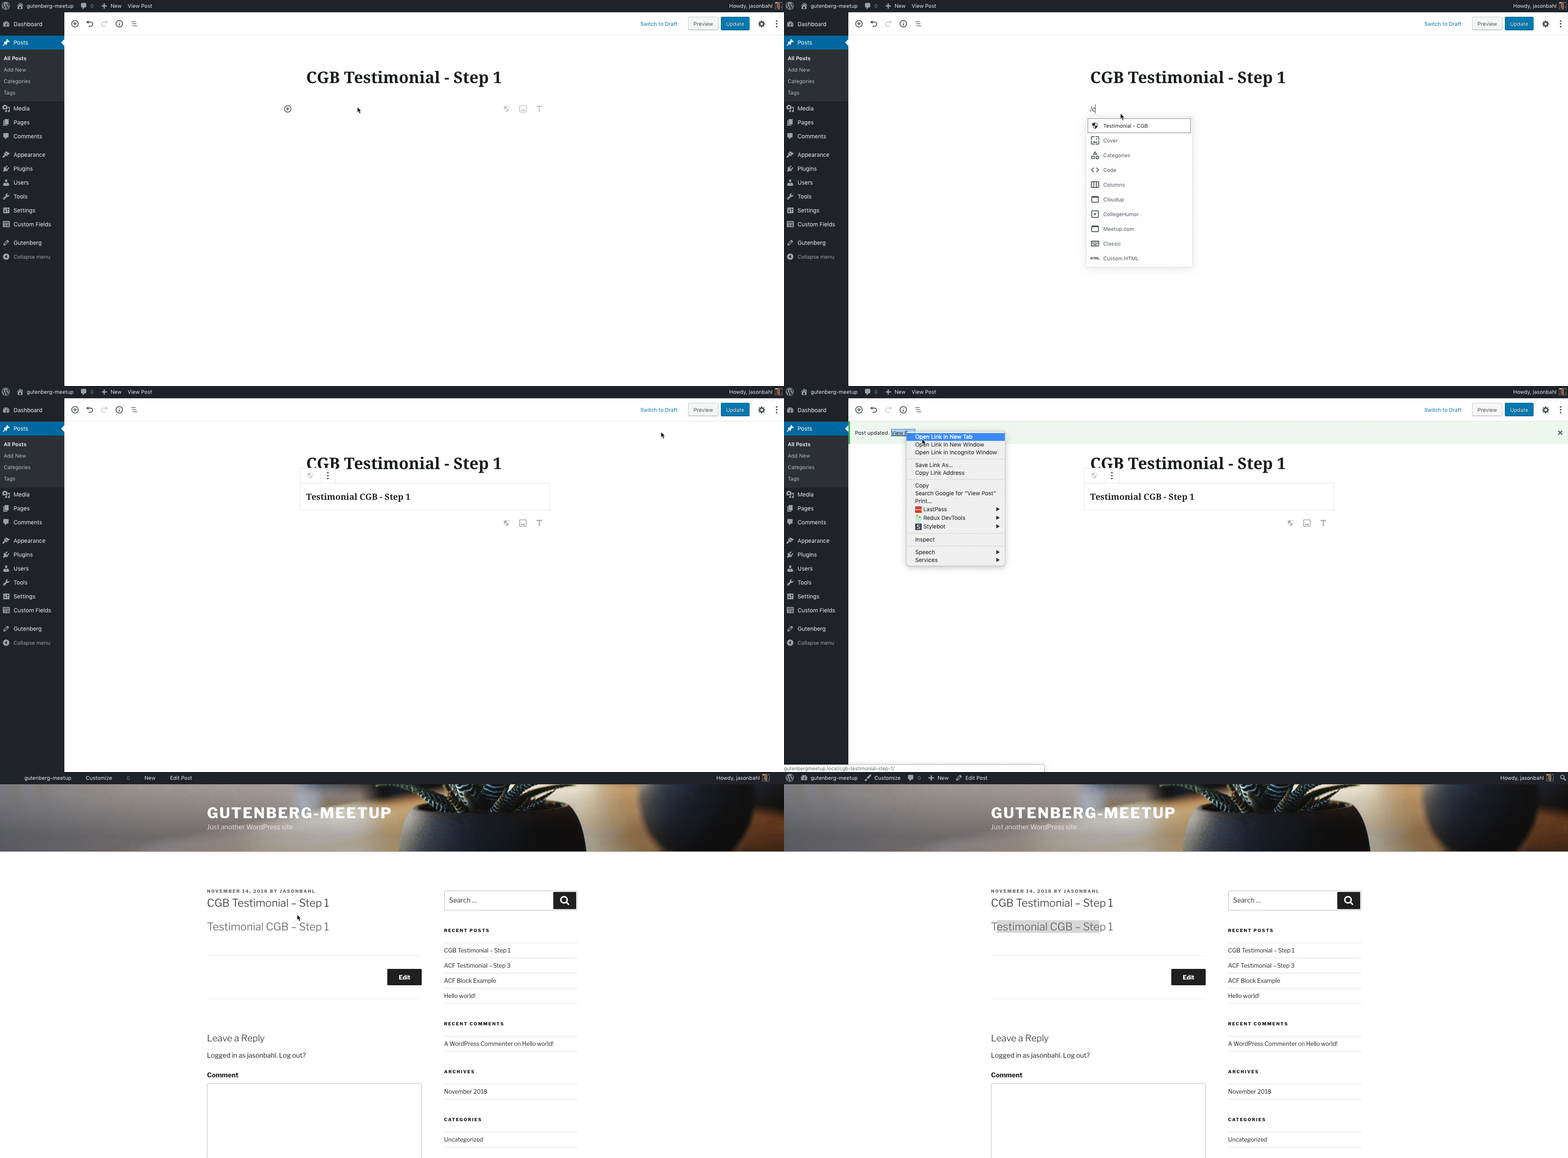
In our case, currently, for save and edit we simply return an <h2> tag.
At this point, our block looks like so:
Step 4: Initial Markup and Styles
Let’s write our initial markup and styles so we can start seeing our Block come together.
Let’s create a BlockContent component that will return our HTML structure (the same HTML we’re using in the ACF example).
Below our const declarations, add the following:
const BlockContent = () => {
    const testimonial = 'Testimonial...';
    const avatarUrl = 'https://placehold.it/55x55';
    const name = 'Citation Name';
    return(
	<div id="cgb-testimonial" className="cgb-testimonial">
	    <div className="cgb-testimonial-text">
		{testimonial}
	    </div>
	    <div className="cgb-testimonial-info">
		<div className="cgb-testimonial-avatar-wrap">
		    <img src={avatarUrl}/>
		</div>
		<h2 className="cgb-testimonial-avatar-name">
		    {name}
		</h2>
	    </div>
	</div>
    );
};
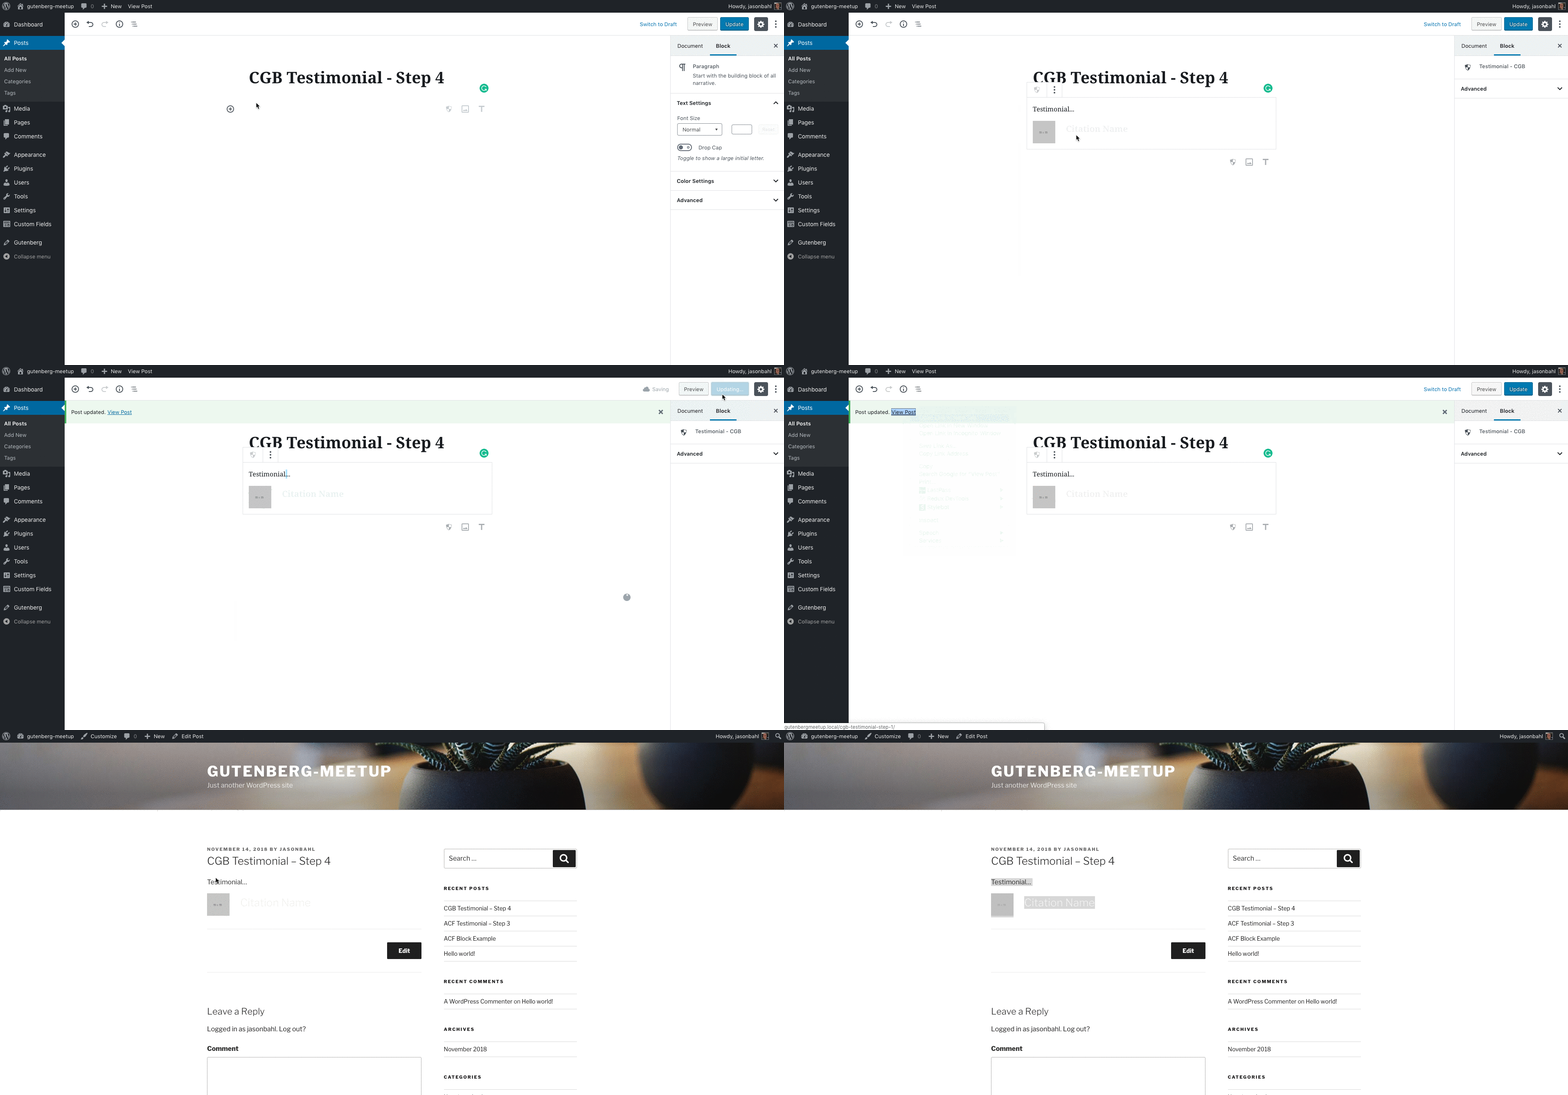
This is a functional Component that simply returns our Markup.
Above the return statement, we declare some dynamic values testimonial, avatarUrl and name. These eventually will be fields that we will edit, but for now we’ve hard-coded their values. Then we output them in our markup using squiggly brackets, such as {testimonial}.
Next, let’s create an EditBlock component. For now, it will just return the <BlockContent />, but we’ll build on it shortly to provide interaction.
Add this:
class EditBlock extends Component {
	render( ) {
		return [
			<BlockContent />
		];
	}
}
Also, make sure to add const { Component } = wp.element; at the top of the file, as we’re now extending the Component from the core WordPress element
Now, update the edit part of our registerBlockType to be: edit: EditBlock, save to be:
save: function( props ) {
  return (
    <BlockContent />
  );
}
So, right now, our Edit and Save functions are both returning the exact same <BlockContent /> component, but we’re set up to start changing the editing and saving experience.
At this point, the block should look like so:
Step 5: Define Attributes & Add Inspector Controls
This is a pretty big step, so instead of showing the code changes here, check out the DIFF on Github.
I’ll explain a few parts here though.
Declare attributes
If there are any dynamic properties of a block we want to edit, we need to declare them. Gutenberg calls these dynamic properties “attributes”.
In our case, we know we need the following dynamic properties to be editable: testimonial, avatarUrl, avatarId, name, background_color, text_color, and alignment.
We define those like so:
attributes: {
  testimonial: {
   type: 'string',
   default: 'This is a testimonial'
  },
  avatarUrl: {
    type: 'string',
    default: 'https://placehold.it/100x100'
  },
  avatarId: {
    type: 'int',
    default: null,
  },
  name: {
    type: 'string',
    default: 'Citation Name'
  },
  background_color: {
    type: 'string',
    default: 'blue'
  },
  text_color: {
    type: 'string',
    default: 'white'
  },
  alignment: {
    type: 'string',
    default: 'left'
  }
},
Add Inspector Controls
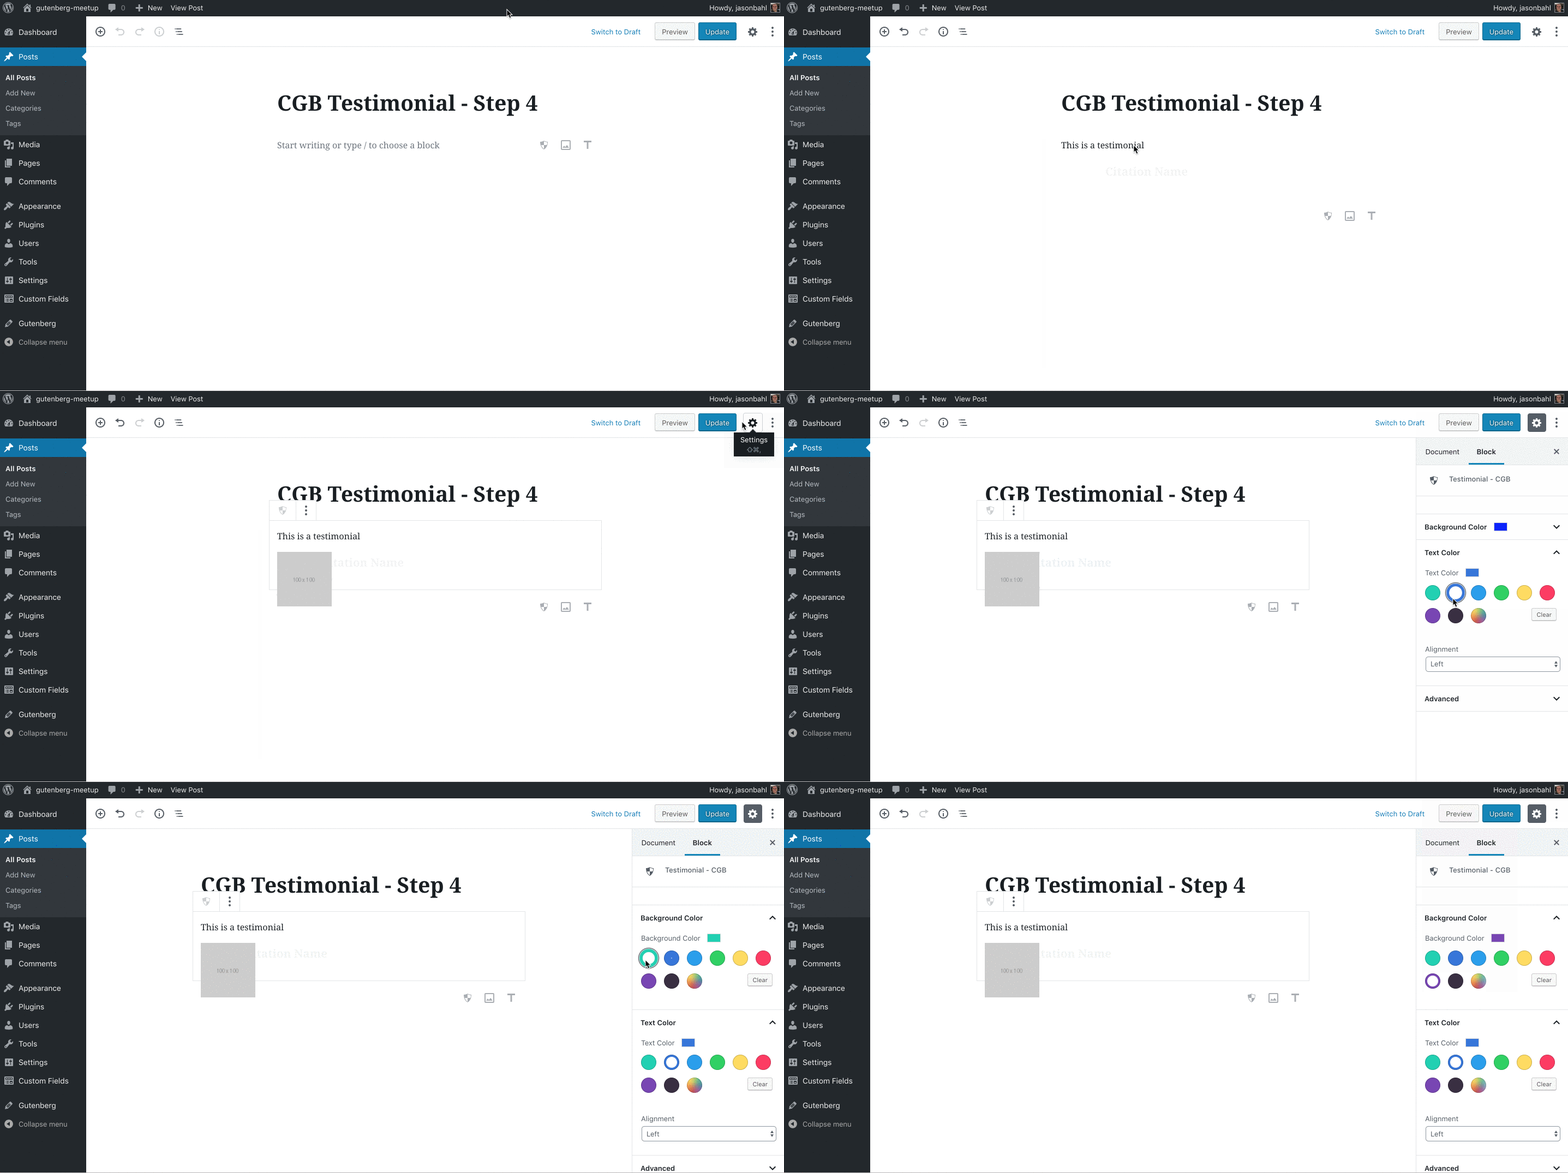
Now, we want to add Inspector Controls to our block. In Gutenberg, when you select a block, on the right is a panel that allows you to modify block settings. This is referred to as the “Block Inspector”.
We’re going to make use of existing Gutenberg-provided components to build out our Inspector controls.
At the top of the file we add:
const {
    RichText,
    InspectorControls,
    PanelColorSettings,
    MediaUpload,
} = wp.editor;

const {
    Button,
    PanelBody,
    SelectControl,
} = wp.components;
This pulls in some components for us to use to build out our block settings.
Next, we create our Inspector component like so:
class Inspector extends Component {
    constructor( props ) {
        super( ...arguments );
    }
	render() {
        const backgroundColors = [
            { color: '#00d1b2', name: 'teal' },
            { color: '#3373dc', name: 'royal blue' },
            { color: '#209cef', name: 'sky blue' },
            { color: '#22d25f', name: 'green' },
            { color: '#ffdd57', name: 'yellow' },
            { color: '#ff3860', name: 'pink' },
            { color: '#7941b6', name: 'purple' },
            { color: '#392F43', name: 'black' },
        ];
         const alignOptions = [
            { value: 'left', label: __( 'Left' ) },
            { value: 'right', label: __( 'Right' ) }
        ];
         const { setAttributes, attributes: { background_color, alignment, text_color }} = this.props;
         return(
            <InspectorControls key="inspector">
                <PanelBody>
                    <PanelColorSettings
                        title={ __( 'Background Color' ) }
                        initialOpen={ false }
                        colorSettings={ [ {
                            value: background_color,
                            colors: backgroundColors,
                            onChange: (value) => setAttributes({ background_color: value}),
                            label: __( 'Background Color' ),
                         } ] }
                    />
                    <PanelColorSettings
                        title={ __( 'Text Color' ) }
                        initialOpen={ false }
                        colorSettings={ [ {
                            value: text_color,
                            colors: backgroundColors,
                            onChange: (value) => setAttributes({ text_color: value}),
                            label: __( 'Text Color' ),
                         } ] }
                    />
                    <SelectControl
                        label={ __( 'Alignment' ) }
                        description={ __( 'Left or right align the cite name and title.' ) }
                        options={ alignOptions }
                        value={ alignment }
                        onChange={ ( value ) => this.props.setAttributes( { alignment: value } ) }
                    />
				</PanelBody>
			</InspectorControls>
		);
	}
}
There’s a lot going on here, so I’ll explain a bit.
First we define the backgroundColors we want to be available in our color pickers, and we define the alignOptions we want to be available to our alignment Select option.
Next, we pluck setAttributes and our actual attributes out of this.props for use in the component.
In React, data passed down from one component to another are called ‘props’. So, in order for the Inspector to have access to setAttributes and the attributes, these will have to get passed to the <Inspector> component, and we’ll see where that happens later.
Next, we return an instance of <InspectorControls> with our nested controls.
I’d argue that it’s fairly easy to understand what’s happening here, even if you’re not a React expert, as it kind of reads like HTML now. We can see that inside our inspector we have a PanelBody, and inside that we have 2 instances of PanelColorSettings (color pickers for the background and text color) and a SelectControl for selecting the alignment option.
Each of these controls has an onChange method, which passes the value through and calls setAttributes() where the new value of the field is saved by Gutenberg to the block.
Now, in our EditBlockContent component, we’ve also made some changes. I’ll let you digest some of them on your own, but want to point out one specific change.
Our return statement returned an array previously. It still returns an array, but now the first thing it returns is <Inspector { ...{ setAttributes, ...this.props } } />,
This is the Inspector component we just built which includes all of our form controls for editing the block, and the next thing it returns is our actual editable block.
So, we’re telling Gutenberg that we have multiple components at work here. We have the Inspector and the Block itself. So now, when users select our block to edit it, Gutenberg does the heavy lifting of showing the user our Inspector controls and our block in a selected/editable state. And here, we’re passing the props from the Block instance down to the Inspector, which is how the Inspector has the ability to access the attributes and call setAttributes() on behalf of the block.
At this point, we have a block that has Inspector controls that you can interact with, but our block still doesn’t respond to changes in the controls. We’ll wire that up next.
Step 6: Connect the block to our Inspector Controls
Now that we have a block and inspector controls, we need to wire it up to respect the changes of the inspector controls and react (pun intended) to the changes.
We also are missing the ability to edit the testimonial text, citation text, and set the avatar image. We’ve opted to make those inline fields instead of Inspector fields (just to show another approach).
The DIFF for this step is a lot to grok again, so take a look at the DIFF here and digest what you can.
One thing to note, is that we’ve added a utility called classnames. You can add that yourself by running npm install classnames --save or by manually editing your package.json as seen in the Diff.
We’ve also added an icons.js file which exports an SVG Icon we’re using in this step.
So now, back in the block.js file we import classnames from 'classnames'; and import icons from './icons';. Note the first import isn’t relative, so it will come from our node_modules, but the second import is relative to our project.
Next, if you look at our EditBlock component, it’s changed quite a bit.
It’s replaced some of our otherwise “normal” HTML markup with some editable components. For example, our Testimonial is now a <RichText> component that is configured to change the testimonial attribute when it’s changed. This allows us to type inline in the block and have the testimonial change. We can also declare what kind of RichText features to support, such as bold, italic, strikethrough, etc.
We use the RichText component again for the citation, and we use a <MediaUpload> component for selecting the avatar image. The MediaUpload component is set to modify the avatarUrl and avatarId attributes when we select an image from the media library.
Now, if we look at the save method, it’s changed quite a bit as well.
At the top, we get the attributes we need from the props that the block passes down:
const { attributes: { testimonial, avatarUrl, name, background_color, text_color, alignment }} = props;Then we tell Gutenberg how we want the content to save. We were previously saving raw HTML with a few dynamic values, but that will create some funky formatting when we get the values from the RichText component, so <RichText.Content> to save our content.
Then we also make use of some dynamic style={{}} tags to apply the values of the color pickers to our dom nodes so the dynamic styles can be saved and rendered in our theme.
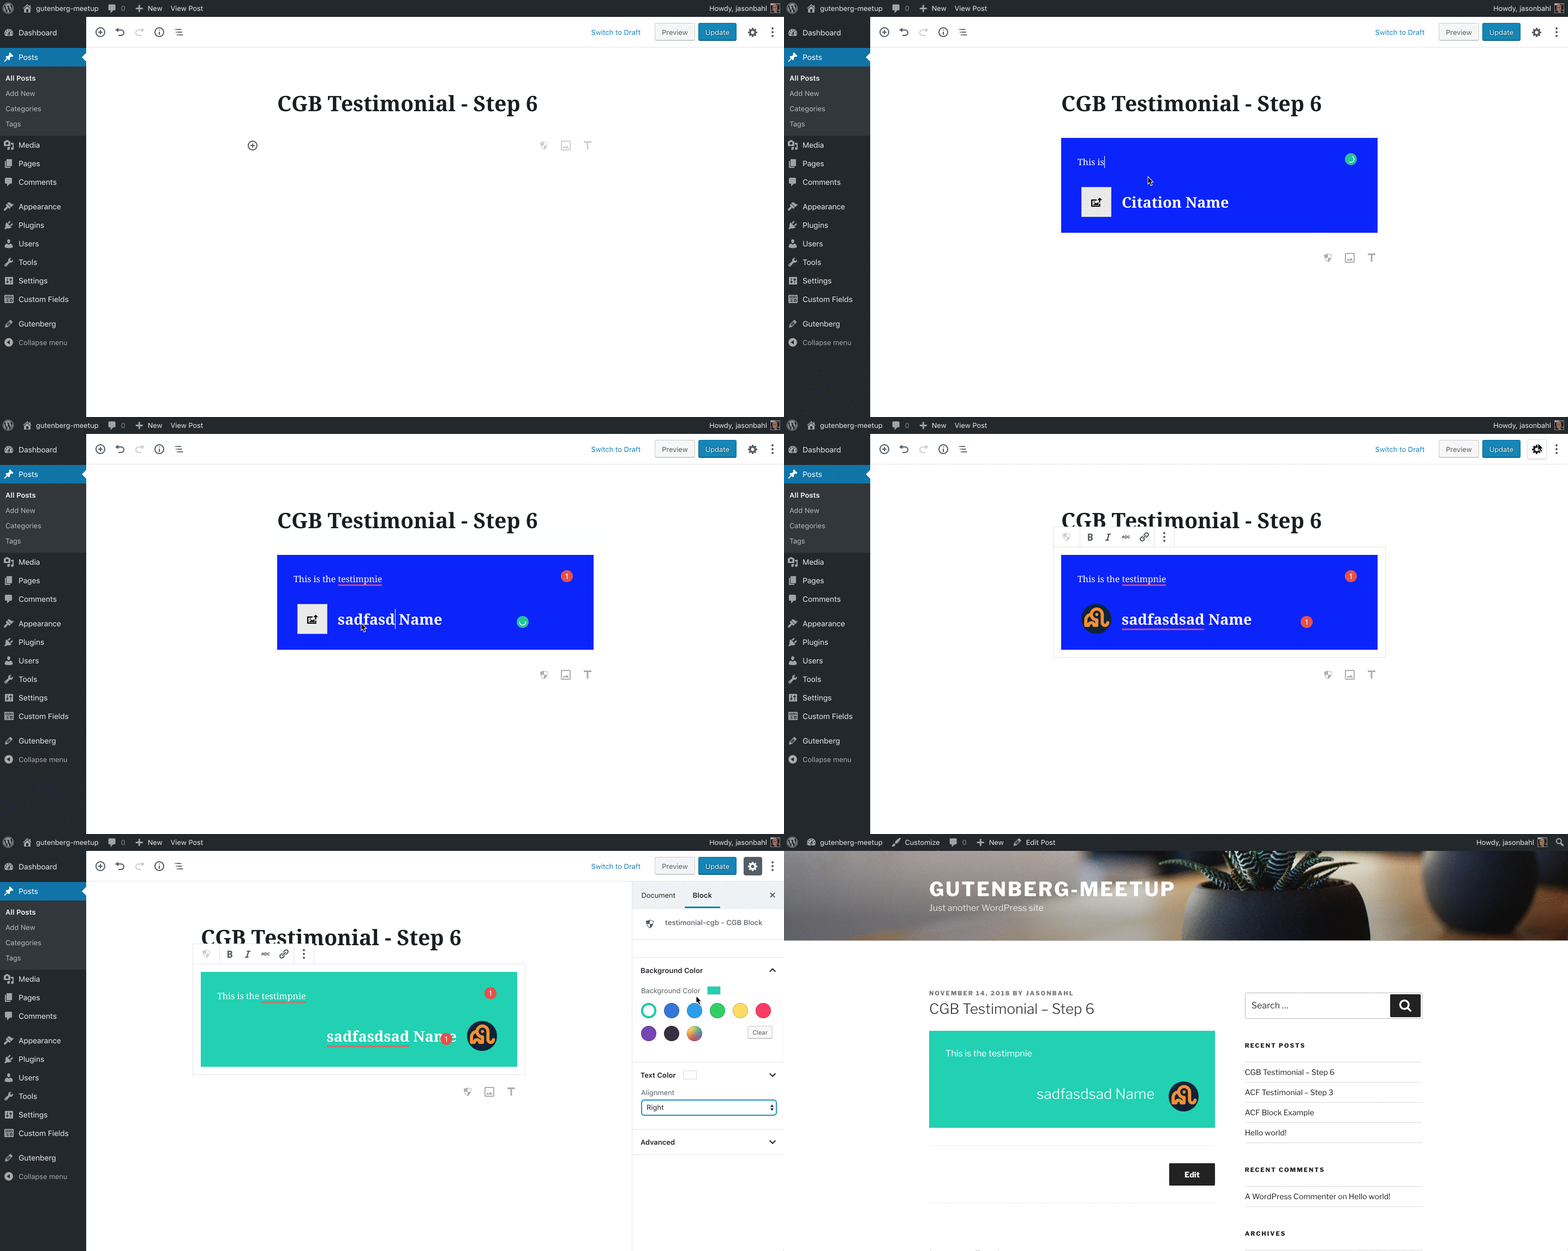
At this point, our block is fully functional:
Conclusion
In my opinion, the developer experience provided by ACF is closer to what I would have expected the core Gutenberg developer experience to be. I believe that Gutenberg core should provide a lot of UI elements that can be used by sending up a description of blocks from a server side registry, Gutenberg reads that description of blocks, and renders the UI to interact with them. ACF provides this API. We didn’t have to write a single line of JavaScript and we had a fully functioning Gutenberg block.
The ACF integration is still young and there are limits to it, but it seems like it’s evolving very nicely, and I hope the Gutenberg core team pays attention and works toward an API that allows blocks to be created in a similar fashion where a server side API can be used to build blocks, and custom JS can be added only when the PHP API can’t get you the custom results you need.
I’ve written quite a lot on why Gutenberg needs a server-side API here and here already, but we can certainly add improved Developer Experience to that list as well.
The Create Guten Block experience is not bad
Even with a background in building React apps, building Gutenberg blocks does require a LOT of knowledge of JavaScript, React, certain historical decisions of the Gutenberg project, lightly/undocumented features of Gutenberg, es6 (you can write blocks in es5, but I wouldn’t recommend it), etc. There are certain ways in which Gutenberg deviates from standard React, so you have to learn and get used to some new conventions.
We had to write a whole lot more code to get to essentially the same outcome as our ACF block, and in this case, the server has NO knowledge our block even exists, which I would argue is a bad direction for WordPress to head in.
With the ACF approach, the server is fully aware of the block, so tools like WP-CLI, REST API, WPGraphQL, etc can expose data about the registered block and the block becomes immediately more useful than our client-only block.
I do believe that building blocks on the client does empower developers to create more unique experiences so I don’t think I’ll ever argue that Gutenberg should not have a rich JavaScript API for building/extending blocks, but I definitely will continue to argue that the primary API for blocks should be a Server Side API, similar to what ACF (or Gutenberg Fields Middleware) are doing, where users can register blocks on the server, and that block registry is used to build the client representation without any JS needed. Then custom JS should be brought in for the situations where a generic API could not fulfill the blocks needs.
Anyway, I hope this guide helps show some possibilities of Gutenberg and helps ya’ll understand some options for working with it.
“This is registers the fields we need so we don’t need to use the ACF UI, ..”
Why not? Wouldn’t it be more flexible to use the ACF UI and require less code?
Using code instead of the UI allows for the field registration to be put into version control. It’s great that ACF allows for many ways to register fields, and for some sites using the UI might be the best option, but I prefer having the registration of the fields maintained in Git so that if they ever need to change the changes are tied to a specific commit in the code history, etc.
Nice comparison, enjoyed the post thoroughly. I still believe that moving more and more towards the JavaScript programming language would introduce much better dev/user experiences in the WordPress community.
Also, thanks for all the kind words. I am hoping to push a major upgrade to create-guten-block next year. The version I am using for my projects is much more advanced and capable but it’s too tightly tied with my workflow. Hope to open source it bit by bit.
Peace! ✌️
> I still believe that moving more and more towards the JavaScript programming language would introduce much better dev/user experiences in the WordPress community.
I agree that WordPress and the community at large should continue to embrace JavaScript, but I still do believe that there’s a LOT of value the WordPress server can/should provide to Gutenberg that’s largely been ignored to this point in Gutenberg development.
There are a lot of open issues on the Gutenberg repo regarding various issues that continue pointing more and more to the need for a good server-side API. For example, ASYNC loading of block components, etc. Right now, you need to enqueue ALL of the JS for ALL of the blocks whether they’re used on the page or not. Talk about a performance nightmare in the making. A good server-side API could help by only enqueuing scripts needed for the blocks actively being used and letting blocks enqueue their dependant scripts only when they’re interacted with.
As Gutenberg moves to more parts of WordPress, we’ll find that we NEED a good server API for more things too, like validation of settings fields (and whatever else Gutenberg touches).
I’m stunned. I have not tried Gutemberg yet but your article is scary. In the “normal” version of WordPress, to create a paragraph of text with an image, I take 30 simple seconds. In Gutemberg do I need to know all these codes and add Custom Fields? Do I need to take a PHP or JavaScript programming course?
To use Gutenberg as an end user, writing content and building pages, you don’t need to write all this custom code. This post describes what it takes to code custom blocks. For many people, the core blocks that Gutenberg comes with might be sufficient to use, but for many projects custom blocks will be needed to be built and this sheds some light on some different ways to do build custom blocks.
“If you’ve never used React or aren’t that comfortable with JS, I can’t imagine how frustrating it would be to navigate the ecosystem right now.”
Very true, unfortunately.
I’ve stopped to count the hours and days wasted looking messages along the lines of “Module not found: Can’t resolve ‘@wordpress/components’ “, trying to decipher what is missing where and why and how-is-this-even-a-thing. What I was trying to do is something I’d still think of as rather simple and straight-forward: import the standard Gutenberg Columns block into CreateGutenBlock, and then add 3 variants to it.
Doing something similar from scratch would have taken maybe two hours or three hours using ACF in the old PHP-based WordPress way.
True, the user experience *may* be better in the end, but so far even that isn’t true. Using the unedited Columns block has resulted in many, many instanced of rebuilding pages in code view and even in the database, because Gutenberg Columns keep tripping over themselves – not to even mention the ridiculous dances one has to do to even get to the block.
As to what Ahmad says “JavaScript programming language would introduce much better dev/user experiences in the WordPress community” – that’s probably true from a full-stack programmers view. However, it is my opinion that WordPress has also become as relevant as it is today not because things are programmed in the best possible way, but because it has been somewhat easy and accessible changing and creating stuff. Right now to me it seems WordPress is going the other way, a way a lot of high-tech CMS’s went, and remained rather niche products for it.
[…] Two ways to build Gutenberg Blocks […]
Thanks so much for this great tutorial. I’m actually a JS developer, so I’ve been looking for something that lays this out clearly.
A couple of notes and questions:
Notes:
1. Need to add this line for the import component code to work: import { Component } from ‘@wordpress/element’;
2. This line in the tutorial failed for me: “Now, update the edit part of our registerBlockType to be: edit: EditBlock,” – with the error “The “edit” property must be a valid function.”. I’m building a dynamic plugin so I just replaced the edit attribute with the same as the save attribute and it worked fine.
Good catch on declaring the Component. . .I didn’t mention in the tutorial, but I do have it in the source code here:
https://github.com/jasonbahl/gutenberg-testimonial-cgb-example/blob/master/src/block/block.js#L9
I updated the post to call that out.
—-
> I’m building a dynamic plugin so I just replaced the edit attribute with the same as the save attribute and it worked fine.
If you have Save and Edit be the same, I’m not sure your Dynamic block will work as expected, eh? It will end up saving markup to the content of each post, which I don’t think is your intent? Or maybe I’m misunderstanding something?
Hey Jason –
Back story: I didn’t jump right into Gutenberg. I figured I’d give it some time to settle in. Finally, this past week – ~4 months since GB shipped with 5.0 – I began to invest some time.
1) Yours is one of the better articles I’ve come across. High on truth and insight, low on Kool Aid drinking. Thanks!
2) As for GB itself, the product and the doc are, at best, half baked. Yes, there’s a lot to be impressed by. I’m not knocking that. But ready and forcing it in to 5.0? I’m not seeing it.
Things that I presumed would have available (e.g., customizing the color palette at the purpose level, text color = one palette, background color = another palette, and so on) is no where in sight. Even something as simple as adding a component to a core block isn’t possible. Nor is removing (e.g., Advance > Additional CSS Class) can’t be done.
It’s not the developer experience that bothers me ,as much as how these limitations compromise the UX 🙁
Question: Are you still in favor of most of us – at least for now – using the ACF approach?
Note: I’m with you. JS is a great tool but there are just too many good reasons to have GB take advantage of server-side as well. Ignoring it seem intentional. And again I’m left scratching my head trying to figure out why anyone would purposely compromise the (dev) experience.
p.s. Thanks also for the WPGraphQL plugin. I’ve played with it a bit. It’s on my TODO. Unfortunately, Gutenberg was a nasty time suck. Way worse than it should have been. I can’t being to imagine how many dev hours have fallen victim to MM ego. SMH
So nice to do a more complex tutorial that actually works first time! I have done some others that have thrown a variety of errors, I think because Gutenberg and it’s associated technologies are fast evolving so what may have worked 6 months ago is now out of synch.
The only problem I had was adding the classnames package which I could not do by editing the package.json alone so had to npm to install the package.
Now I can examine the code, pull it apart, add other components and finally get my head around Gutenberg and React.
Thank you for your time and effort! 🙂
Have you tried the ‘block lab’ plugin? Is similar to ACF but a bit more straight forward. Don’t need to configure nothing on functions.php, just create the fields and files.
Jason, good article. As someone with developer pretensions, I won’t be using ACF to make custom blocks, even though I like ACF, because I wouldn’t want the blocks dependent on ACF, especially for maintenance. But I have a couple of observations. I came across your article while trying to add Inspector Controls to the Block Controls: Toolbars and Inspector example in the WP Block Editor Handbook tutorials,
https://developer.wordpress.org/block-editor/tutorials/block-tutorial/block-controls-toolbars-and-inspector/
where they only provide an image of the controls, but not the code to implement it.
Anyway, I wound up looking at among other things the actual WP 5.x code for the Paragraph block, to figure out how to display it & make it functional. In the process, I installed the classnames package like you, but was puzzled by the ‘–save’ option you specified. So, googling further, I learned that ‘–save’ has been the default since npm 5.0.0, so you might want to revise your article and omit it.
Finally, a question, for you or anyone else reading this who might know. The example for the FontSizePicker control in the Block Editor docs,
https://developer.wordpress.org/block-editor/components/font-size-picker/
uses withState. I managed to do so, but was wondering why/if this component requires withState.
As someone who has built React apps for websites, I find it extraordinarily frustrating that the React implementation in Gutenberg is only for the backend interface. There is little documentation that points out this fact, and while there are people who claim to have implemented react code for the frontend (through re-registering the block in php somehow), I cannot find any documentation or tutorial on how to do that. Until someone releases this information, or until WordPress includes this in its core, Gutenberg will merely be a fancy way for creating static content.
Thanks for sharing this tutorial. Can you also please guide me how can I create a block template? I am doing the same using this resource https://wpitech.com/create-wordpress-gutenberg-block-templates/ but it’s giving an error and I am having some programming lines in front end. This is the code
add_action( ‘init’, function() {
$args = array(
‘public’ => true,
‘label’ => ‘News’,
‘show_in_rest’ => true,
‘template_lock’ => ‘all’,
‘template’ => array(
array( ‘core/paragraph’, array(
‘placeholder’ => ‘Breaking News’,